Blogs

How to Install a Bathroom Towel Holder

Installing a Bathroom Towel Holder can seem like a quick weekend project, yet the right position and mounting method make a real difference. A bar placed too close to a vanity may be awkward to reach. One mounted too high can leave towels dragging against a shelf or wall. Before drilling, consider who uses the bathroom, how much space the door needs, and whether the towel can hang freely. Small details matter.

The wall itself guides the installation. Tile, drywall, and solid wood require different drill bits or fasteners, so check the holder’s instructions before starting. If possible, attach the brackets to wall studs for a secure hold. When studs are not in a useful location, choose anchors rated for the wall material and expected load. Use a level, mark both screw holes carefully, and check for hidden pipes or wiring before drilling. Measure twice. A crooked bar is surprisingly noticeable. And sometimes, the first mark is wrong; step back and reassess before making a permanent hole.

This guide will walk through planning, tools, mounting, and final checks in clear steps. It will also explain common installation problems, such as loose brackets or towels that brush against nearby fixtures. Follow the manufacturer’s directions, work patiently, and avoid forcing screws into resistant surfaces. A little preparation can help your Bathroom Towel Holder feel stable, look balanced, and serve the room well for years.
How to Install a Bathroom Towel Holder

Select a Reachable Height: ADA Unobstructed Reach Is 15–48 Inches

Before drilling, mark the towel holder’s centerline and check the user’s natural reach from a seated position. The 2010 ADA Standards for Accessible Design list 15 to 48 inches above the floor as the unobstructed forward and side reach range. Treat this as a useful accessibility benchmark, not a rule that automatically governs every towel holder. The standards’ reach provisions apply to elements that need to be reached or operated; local requirements and the bathroom layout may affect your installation.

Measure twice. A holder set within that range can still be awkward if a vanity, shower screen, or open door blocks access. Keep the towel’s edge clear of the sink, and test the location with the bathroom user before drilling. For a household with different heights or mobility needs, favor the position that works comfortably for the person who uses the towel most. That may not be the most symmetrical spot on the wall. Check the wall for studs or suitable anchors, then confirm the holder will not collide with drawers or doors. The U.S. Access Board’s guidance on ADA Standards Section 308 explains reach ranges and obstruction limits; use it to assess the actual approach, not just the mounting height.


Check Wall Framing: Wood Studs Are Commonly 16 Inches on Center

Before installing a bathroom towel holder, check where the wall studs sit. Wood studs are commonly spaced 16 inches on center, measured from the middle of one stud to the middle of the next. That spacing is a useful clue, not a promise. Older homes, corners, and areas around plumbing may have different framing.

Use a stud finder slowly, following its instructions. Mark both edges of the stud, then mark the midpoint between them. A small test hole in the planned mounting area can help confirm the location, but check for pipes or wiring before drilling. One signal is not enough; stud finders can be fussy, especially near tile or metal. It is worth pausing.

Hold the mounting plate over your center mark and check that the screw holes align with solid wood. If they do not, shift the holder slightly or use suitable wall anchors rated for the fixture and expected load. On tiled walls, use a bit designed for tile, drill gently, and avoid forcing the screw. I would not assume the next stud is exactly 16 inches away; measure it yourself. A few careful marks can prevent a loose holder and unnecessary wall repairs.

How to Install a Bathroom Towel Holder — Check Wall Framing: Wood Studs Are Commonly 16 Inches on Center
Installation Check Typical Measurement or Fact What to Do Important Note
Common wood-stud spacing 16 inches on center (16 in. OC) Use a stud finder to locate the center of each stud where the holder will go. Sixteen inches is common, but spacing can vary. Confirm each stud rather than relying on an assumed location.
Alternative stud spacing 24 inches on center is also used in some walls Scan a wider area if a stud is not found at the expected 16-inch interval. Older homes, additions, and unusual framing may have different layouts.
Confirming a stud location A stud finder usually indicates an edge or center, depending on its mode Follow the tool instructions and mark the stud center. A small pilot hole in a discreet spot can help confirm the location. Check for plumbing or electrical wiring before drilling, especially near fixtures and switches.
Mounting into a wood stud Use suitable screws that penetrate the stud Position the mounting bracket over the stud and drill pilot holes sized for the screws and wood. Choose screw length and diameter appropriate for the bracket and wall assembly; avoid overtightening.
Bracket holes do not align with studs Many towel-holder brackets have fixed hole spacing Use wall anchors rated for the wall material and expected load, or select a mounting location that allows secure fastening to framing. Follow the anchor instructions and load rating. Do not assume a drywall-only fastener can support any load.
Before drilling Check the holder’s mounting template and required clearances Hold the holder in place, level it, mark the holes, and verify the position before making holes. Measure twice and account for the holder’s end brackets and the length of the towel bar.
After installation The holder should sit firmly without wobbling Tighten the mounting hardware, attach the holder, and gently test it by hand. If the wall flexes or the holder loosens, stop using it until the mounting is corrected.

Mark Bracket Locations, Level the Layout, and Check Clearances

How to Install a Bathroom Towel Holder

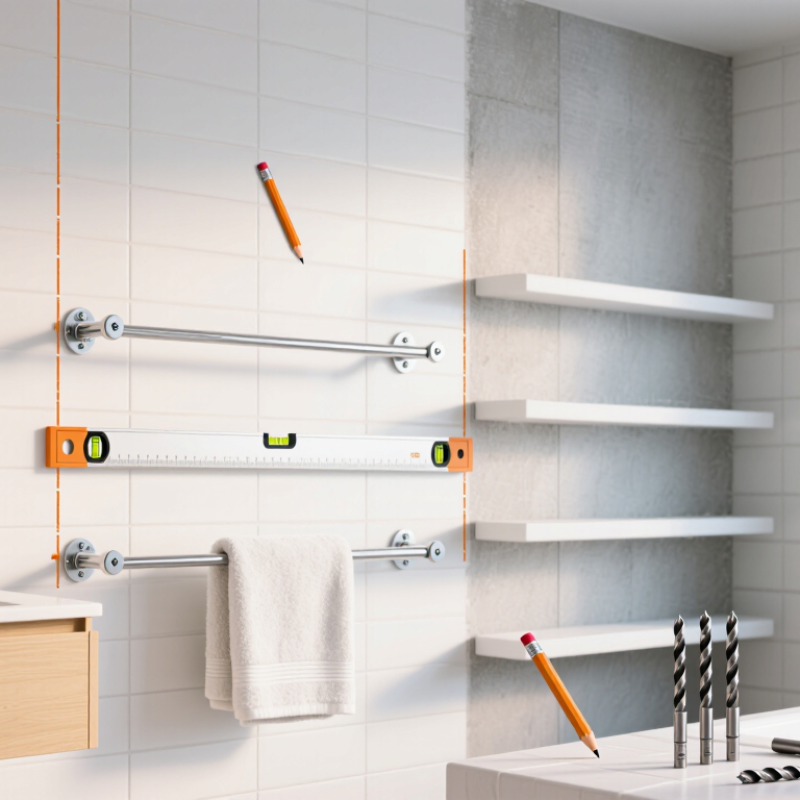
Mark the bracket locations before drilling. Hold the towel holder at a comfortable height, then check that its ends sit clear of nearby shelves, trim, and shower doors. Measure from the floor or vanity to keep the layout consistent. Use a pencil for small marks; they are easier to adjust than large dots. A level helps align both brackets, but check the holder itself too. Slightly uneven walls can make a neat pencil line look misleading.

Tips: Measure the distance between the brackets on the holder, then transfer that exact spacing to the wall. Recheck both marks with a level. Leave enough room for a towel to hang without brushing the counter or blocking a drawer. If one mark seems off, pause and measure again. It can feel fussy, but a second check is cheaper than patching an extra hole.

Before drilling, confirm the wall material and choose suitable anchors or fasteners. Avoid drilling near visible plumbing or electrical fixtures; when unsure, check for hidden services first. I find it easy to focus on getting the holder perfectly level and forget how it will feel to use. Stand back, reach toward the marked spots, and imagine lifting a damp towel from them. The first layout may not be the best one. Adjust the marks until the holder looks balanced and has practical clearance.

Drill Pilot Holes and Choose Anchors Rated for the Wall Material

How to Install a Bathroom Towel Holder

Mark the bracket positions with a level, then check the wall before drilling. A stud finder can locate framing behind drywall. If the holder’s holes miss a stud, choose anchors rated for the wall material and the expected load. Towel bars are often tugged harder than people expect. Measure twice. A pencil mark can still end up slightly off, so recheck spacing against the holder itself.

Drill pilot holes using a bit suited to both the anchor and the surface. On tile, use a tile-rated bit and low pressure; rushing can crack the glaze. Drill through the tile carefully, then use an anchor appropriate for the material behind it. For drywall, use a properly sized hollow-wall anchor unless the screws reach a stud. In masonry, select masonry anchors and follow their installation directions. Clear dust from each hole so the anchor can seat securely.

Tips: Wear eye protection and keep the drill straight. Don’t force an anchor into an undersized hole. If it spins or feels loose, stop and reassess rather than relying on a weak fit. A slightly slower installation is better than a holder that pulls away from the wall.

Fasten the Holder and Check Its Stability Before Use

How to Install a Bathroom Towel Holder

Fasten the Holder and Check Its Stability Before Use

Once the mounting holes are marked, drill carefully and clear dust from each hole. Use screws and anchors suited to the wall: a stud, tile, and hollow drywall need different fixings. On tile, begin with a suitable bit and low pressure to reduce cracking. Keep the holder level. Small shifts are obvious against grout lines.

Tighten the screws until the brackets sit firmly, but do not force them; overtightening can damage tile or strip a fixing. Give the bar a gentle pull from several directions. It should not wobble, creak, or lift from the wall. I still check mine twice. A loose bracket is easier to correct before towels go on.

A towel rail is not a grab bar. A CDC analysis of U.S. emergency-department data found 234,094 bathroom-related injuries among people aged 15 and older in 2008, with falls accounting for most injuries. That figure is a reminder to avoid leaning on bathroom fittings. Hang a damp towel, then recheck the screws after a day or two. If the holder shifts, stop using it and inspect the anchors and wall surface before tightening or remounting.

Plug & Play Installation

Our installation services are top-notch, delivering modular systems for any application on time in plug & play condition. We leave nothing for you to figure out, set up, or fix. All you’ve to do is just step in, and get going with your business.

Dismantling & Reassembling

We hold a long-term view when we build modular rooms taking into consideration your changing needs. Whether it’s shifting your workspace to a new site, redesigning your unit to fit new requirements, or simply clearing the area at the end of the project, our Dismantling & Reassembling teams are pressed into service to get the job done in the quickest possible time and minimum resource wastage.

Interior Designing

Our interior designs combine both functional and aesthetic aspects to provide you with physical and emotional comfort. We ask you for your preferences and give the best possible solutions aligned to your tastes. Our units are built to be modern, stylish, and elegant.

Bespoke Solutions

We understand that every project is unique and therefore has a different set of requirements. That’s why we believe in customizing our solutions to fit individual needs. We are equipped with the right talents, technology, and skillset to offer bespoke modular units, without compromising on turnaround time or quality.

Aftersales Service

The benefits of choosing Containers ME continues long after the installation of the units as we provide aftersales service for as long as you need. All you have to do is sign the Annual Maintenance Contract (AMC) and enjoy technical support for all the maintenance-related issues. By signing the contract, you can rest assured that a highly professional team of dedicated staff are at your service all year round to attend to your needs.

Customized Container Solutions

We specialize in Customized Container Solutions designed to meet diverse needs across the UAE. Our offerings include customized modular containers that cater to various applications, from tailor-made container solutions to bespoke container designs.

Whether you’re looking for personalized container homes or custom modular containers, we have you covered. Our customized container offices provide functional workspaces, while our customized portable containers ensure flexibility on-site. Explore our range of custom container storage units and customized cargo containers to optimize your space.

We also offer custom container leasing and custom container fabrication services, along with customized sea containers designed for secure transport. For specialized needs, our specialized container modifications will help you create the perfect solution for your requirements in both Dubai and the broader UAE.

Get a quote

Get a quote