
Blogs

How to Use PU Foam Sealant for Better Insulation?

Buildings lose energy through more than walls and windows. Small gaps around pipes, frames, and service penetrations can create uncomfortable drafts and uneven room temperatures. The International Energy Agency reports that buildings consume about 30% of global final energy. Its recent buildings analysis also links the sector to roughly 26% of global energy-related emissions. These figures make practical air sealing increasingly important.

This guide explains how to use PU foam sealant for better insulation without treating it as a universal solution. The U.S. Department of Energy identifies air sealing as a key step in reducing uncontrolled infiltration. ENERGY STAR guidance also recommends sealing leaks before upgrading insulation. Foam can expand behind a window frame, around wiring, or beneath a threshold. The result should be a continuous air barrier, not a hardened mound of excess material.

The process is less tidy than many brochures suggest. A narrow opening usually needs less foam than expected. Overfilling can distort frames, waste material, and complicate finishing. Field installers commonly check the surface, temperature, moisture, and foam compatibility first. They also trim cured foam carefully and protect it from sunlight. Product labels and local building codes remain essential, especially near electrical equipment, chimneys, and fire-rated assemblies. The Occupational Safety and Health Administration recommends appropriate ventilation and personal protective equipment when handling chemical products. Foam is useful. It is not magic. Careful preparation, controlled application, and a final inspection determine whether the insulation improvement lasts.
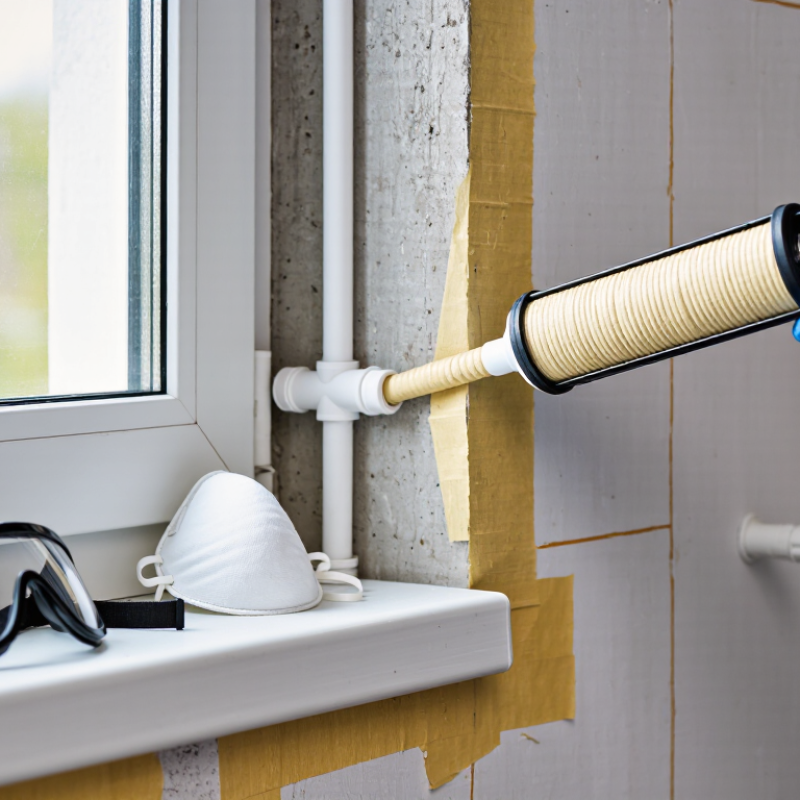
How to Use PU Foam Sealant for Better Insulation?

Identify Gaps and Choose PU Foam by R-Value: R-3.5–R-7 per Inch

Before applying PU foam sealant, walk the area with a flashlight and mark every gap. Check window frames, pipe penetrations, sill plates, and cable openings. Dust and moisture can reduce adhesion, so clean the surface and let it dry. I usually test a small bead first. It is less wasteful, and my first estimate is not always right.

R-value helps match the foam to the insulation need. The U.S. Department of Energy’s Building America Solution Center reports approximately R-3.5 to R-3.7 per inch for open-cell spray foam. Closed-cell foam commonly reaches about R-6 to R-7 per inch. This matters when a narrow cavity needs stronger thermal resistance.

A two-inch layer may provide roughly R-7 with open-cell foam, but nearly R-14 with high-performing closed-cell foam. Check the product’s tested data, not only the label.

Apply foam in controlled lifts, because expansion can bow trim or block drainage paths. Fill deep cavities partly, allow curing, then add another layer. Seal air leaks, but do not cover intentional ventilation openings. DOE guidance treats air sealing and insulation as separate performance steps. The 2021 International Energy Conservation Code also emphasizes continuous insulation and sealed building assemblies. R-value changes with temperature, thickness, aging, and installation quality. I still recheck cured foam with smoke or infrared inspection, because a neat surface can hide a missed channel.

Prepare the Joint: Keep Surfaces Clean, Dry, and Above 5°C

How to Use PU Foam Sealant for Better Insulation?

Prepare the joint carefully before applying PU foam sealant. The surface must be clean, dry, and free from dust, oil, loose paint, and frost. A practical test is simple: wipe the joint with a clean white cloth. It should leave little or no visible residue. Moisture can weaken adhesion and create voids during curing. The substrate should also remain above 5°C, while the can temperature must follow the product’s technical data sheet.

The 5°C threshold is not magic. Cold masonry slows expansion and curing, especially in deep gaps. Use a thermometer rather than guessing from the weather. If condensation appears, stop and dry the area first. Lightly misting a compatible, dry surface may support curing for some formulations, but excess water can damage foam structure. I have seen good-looking applications fail because the joint felt dry, but its center was still damp.

ENERGY STAR’s home-sealing guidance indicates that reducing air leakage can save households up to 10% on annual energy costs. The U.S. Department of Energy also reports that air sealing and insulation upgrades may cut heating and cooling energy use by up to 20%. These figures depend on building condition and installation quality. Apply foam in controlled passes, leaving room for expansion. Do not fill every cavity at once. A narrow gap may need less foam than expected. Often, the quietest problem is hidden moisture.

Apply Foam in Controlled Beads, Allowing 2–3× Expansion

PU foam sealant can improve insulation around frames, pipes, and service openings. Its performance depends less on volume than placement. Before applying, clean dust, loose fibers, and moisture from the joint. A lightly damp surface may support curing, but standing water can weaken adhesion. Wear gloves, eye protection, and maintain fresh airflow. Check the product instructions for temperature limits and curing time.

Apply foam in controlled beads, not one thick, continuous fill. Leave room for 2–3× expansion. This prevents pressure from bending a frame or pushing insulation out of alignment. For a deep gap, build several thin layers after each layer has cured. Move the nozzle steadily, and stop before the cavity looks full. The foam may continue rising after application. In my experience, overfilling is the most common mistake. It looks efficient at first, but trimming later can damage the seal. Cut cured excess carefully, then protect exposed foam from sunlight and physical wear.

Tips: Test a small bead on scrap material first. Watch its expansion and curing behavior. Keep the can upright unless instructions state otherwise. Do not seal drainage paths or moving joints. Recheck the area after curing. Small voids are easy to miss. A thermal camera can reveal cold spots, though it cannot replace visual inspection. Rushing this step often causes uneven coverage.

Trim and Protect Cured Foam Against UV, Moisture, and Fire

PU foam sealant can reduce drafts, but cured foam is not a finished surface.
The exposed bead looks harmless. Sunlight is not harmless. Ultraviolet radiation slowly powders the surface, while rain and condensation can weaken unprotected edges.

The U.S. Department of Energy reports that air leakage may represent 25–40% of heating and cooling energy use.
That figure makes small gaps worth attention.


After the foam fully cures, cut it flush with a sharp knife. Do not crush the surrounding seal. Inspect corners, window joints, and sill plates under direct light. Missed gaps are common. They deserve a second look.

Protect the trimmed surface with a compatible elastomeric coating, sealant, or approved covering. Follow the foam’s cure time and the coating’s surface requirements.

ENERGY STAR guidance from the U.S. Environmental Protection Agency states that air sealing and insulation can reduce heating and cooling costs by up to 20%, depending on construction and workmanship.
Moisture control needs equal care. Keep exterior water away with flashing, drainage planes, and sealed joints.

Never treat foam as a waterproofing system. Fire protection is stricter. Many cured foams are combustible and may require a thermal or ignition barrier, depending on location and local code.

The National Fire Protection Association emphasizes tested assemblies and compliant protection, not improvised coatings.

Field inspections often reveal neat foam repairs with the final covering missing.
Appearance is not performance.

Verify Sealing Performance: Air Leakage Can Cause 25–40% Energy Loss

Small gaps around window frames, pipe penetrations, and wall joints can quietly weaken insulation. The U.S. Department of Energy reports that air leakage may cause 25–40% of heating and cooling energy loss. A warm room can still feel cold near an unsealed skirting board. PU foam sealant helps close these irregular gaps, but only when applied to clean, stable surfaces.

Do not judge performance by appearance alone. A smooth foam bead may still hide gaps, shrinkage, or poor adhesion. The U.S. Department of Energy recommends blower-door testing to locate unwanted air movement. NIST research also shows that measured air leakage can vary greatly between buildings and installation conditions. After curing, inspect the foam and test suspicious areas with smoke pencils or infrared imaging. The test is not glamorous. It often reveals rushed work.

Tips: Remove dust and loose material first. Lightly dampen suitable surfaces before application. Fill deep cavities in layers, not one oversized pass. Trim cured foam carefully, then protect it from sunlight and moisture. Check corners, service penetrations, and window edges twice. Always follow the sealant’s technical data sheet and wear suitable protective equipment. One mistake is easy to make: sealing the visible crack while missing the hidden path behind it.

Plug & Play Installation

Our installation services are top-notch, delivering modular systems for any application on time in plug & play condition. We leave nothing for you to figure out, set up, or fix. All you’ve to do is just step in, and get going with your business.

Dismantling & Reassembling

We hold a long-term view when we build modular rooms taking into consideration your changing needs. Whether it’s shifting your workspace to a new site, redesigning your unit to fit new requirements, or simply clearing the area at the end of the project, our Dismantling & Reassembling teams are pressed into service to get the job done in the quickest possible time and minimum resource wastage.

Interior Designing

Our interior designs combine both functional and aesthetic aspects to provide you with physical and emotional comfort. We ask you for your preferences and give the best possible solutions aligned to your tastes. Our units are built to be modern, stylish, and elegant.

Bespoke Solutions

We understand that every project is unique and therefore has a different set of requirements. That’s why we believe in customizing our solutions to fit individual needs. We are equipped with the right talents, technology, and skillset to offer bespoke modular units, without compromising on turnaround time or quality.

Aftersales Service

The benefits of choosing Containers ME continues long after the installation of the units as we provide aftersales service for as long as you need. All you have to do is sign the Annual Maintenance Contract (AMC) and enjoy technical support for all the maintenance-related issues. By signing the contract, you can rest assured that a highly professional team of dedicated staff are at your service all year round to attend to your needs.

Customized Container Solutions

We specialize in Customized Container Solutions designed to meet diverse needs across the UAE. Our offerings include customized modular containers that cater to various applications, from tailor-made container solutions to bespoke container designs.

Whether you’re looking for personalized container homes or custom modular containers, we have you covered. Our customized container offices provide functional workspaces, while our customized portable containers ensure flexibility on-site. Explore our range of custom container storage units and customized cargo containers to optimize your space.

We also offer custom container leasing and custom container fabrication services, along with customized sea containers designed for secure transport. For specialized needs, our specialized container modifications will help you create the perfect solution for your requirements in both Dubai and the broader UAE.

Get a quote

Get a quote